-
×
 Caterpillar CAT CS-683E Vibratory Compactor Service Repair Manual (ASG00001 and up)
$50.00
Caterpillar CAT CS-683E Vibratory Compactor Service Repair Manual (ASG00001 and up)
$50.00 -
×
 Kobelco LK450 II Wheel Loader Service Manual
$33.00
Kobelco LK450 II Wheel Loader Service Manual
$33.00 -
×
 Sennebogen 825.0.1338 Operators, Maintenance and Parts Manual
$39.00
Sennebogen 825.0.1338 Operators, Maintenance and Parts Manual
$39.00 -
×
 New Holland LB90, LB110 Backhoe Loaders Service Manual
$36.00
New Holland LB90, LB110 Backhoe Loaders Service Manual
$36.00 -
×
 Caterpillar CAT CS-663E, CP-663E Vibratory Compactor Service Repair Manual (DAF00001 and up)
$50.00
Caterpillar CAT CS-663E, CP-663E Vibratory Compactor Service Repair Manual (DAF00001 and up)
$50.00 -
×
 Takeuchi TB153 Compact Excavator Service Manual
$35.00
Takeuchi TB153 Compact Excavator Service Manual
$35.00 -
×
 Bobcat 371 Skid-Steer Loader Service Manual
$32.00
Bobcat 371 Skid-Steer Loader Service Manual
$32.00 -
×
 New Holland B90B, B95B, B95 BLR, B95 TC Backhoe Loader Service Manual
$34.50
New Holland B90B, B95B, B95 BLR, B95 TC Backhoe Loader Service Manual
$34.50 -
×
 Bobcat CT440, CT445 and CT450 Compact Tractor Service Manual
$36.00
Bobcat CT440, CT445 and CT450 Compact Tractor Service Manual
$36.00 -
×
 Caterpillar CAT CS-533E, CP-533E Vibratory Compactor Service Repair Manual (ASL00001 and up)
$50.00
Caterpillar CAT CS-533E, CP-533E Vibratory Compactor Service Repair Manual (ASL00001 and up)
$50.00 -
×
 Kobelco LK400 Wheel Loader Service Manual
$33.00
Kobelco LK400 Wheel Loader Service Manual
$33.00 -
×
 Bobcat S185 Skid-Steer Loader Service Manual
$34.00
Bobcat S185 Skid-Steer Loader Service Manual
$34.00 -
×
 JCB 801 Tracked Excavator Service Manual
$30.00
JCB 801 Tracked Excavator Service Manual
$30.00 -
×
 Bobcat CT335 Compact Tractor Service Manual
$36.00
Bobcat CT335 Compact Tractor Service Manual
$36.00 -
×
 JCB Vibromax VM66 Single Drum Roller Service Manual
$26.65
JCB Vibromax VM66 Single Drum Roller Service Manual
$26.65 -
×
 Bobcat 753 and 753HF Skid-Steer Loader Service Manual
$32.00
Bobcat 753 and 753HF Skid-Steer Loader Service Manual
$32.00 -
×
 Bobcat 1213 Skid-Steer Loader Service Manual
$32.00
Bobcat 1213 Skid-Steer Loader Service Manual
$32.00 -
×
 John Deere 990 Compact Utility Tractors Technical Manual (TM1848)
$30.00
John Deere 990 Compact Utility Tractors Technical Manual (TM1848)
$30.00 -
×
 John Deere XUV 620i Gator Utility Vehicle Technical Manual (TM1736)
$39.00
John Deere XUV 620i Gator Utility Vehicle Technical Manual (TM1736)
$39.00 -
×
 Kobelco LK500 Wheel Loader Service Manual
$32.50
Kobelco LK500 Wheel Loader Service Manual
$32.50 -
×
 John Deere A3 M-Gator Repair Technical Manual (TM115719)
$38.00
John Deere A3 M-Gator Repair Technical Manual (TM115719)
$38.00 -
×
 JCB FM25 Mower Service Manual
$30.00
JCB FM25 Mower Service Manual
$30.00 -
×
 John Deere 860B Scraper Repair Technical Manual (TM1171)
$38.00
John Deere 860B Scraper Repair Technical Manual (TM1171)
$38.00 -
×
 Sennebogen 825.0.1151 Operators, Maintenance and Parts Manual
$39.00
Sennebogen 825.0.1151 Operators, Maintenance and Parts Manual
$39.00 -
×
 Caterpillar CAT 120H Motor Grader Service Repair Manual (5FM00001 and up)
$70.00
Caterpillar CAT 120H Motor Grader Service Repair Manual (5FM00001 and up)
$70.00 -
×
 John Deere 315SL Backhoe Loader Repair Technical Manual (S.N F273920 - F390995)
$60.00
John Deere 315SL Backhoe Loader Repair Technical Manual (S.N F273920 - F390995)
$60.00 -
×
 JCB Midi CX Backhoe Loader Service Manual
$34.00
JCB Midi CX Backhoe Loader Service Manual
$34.00 -
×
 John Deere 310SL HL, 410L Backhoe Loader Repair Technical Manual (S.N after F390996 - )
$57.00
John Deere 310SL HL, 410L Backhoe Loader Repair Technical Manual (S.N after F390996 - )
$57.00 -
×
 Bobcat T300 Loader Service Manual
$35.00
Bobcat T300 Loader Service Manual
$35.00 -
×
 John Deere XUV590i, XUV590i S4 Gator Utility Vehicles Repair Technical Manual
$46.00
John Deere XUV590i, XUV590i S4 Gator Utility Vehicles Repair Technical Manual
$46.00 -
×
 Bobcat S175 Skid-Steer Loader Service Manual
$35.00
Bobcat S175 Skid-Steer Loader Service Manual
$35.00 -
×
 Sennebogen 305.0.398 (305 C+ & 305 XL) Operators, Maintenance and Parts Manual
$38.00
Sennebogen 305.0.398 (305 C+ & 305 XL) Operators, Maintenance and Parts Manual
$38.00 -
×
 Bobcat B780 Loader Service Repair Manual
$38.00
Bobcat B780 Loader Service Repair Manual
$38.00 -
×
 Bobcat X337 and X341 Excavator Service Manual
$29.00
Bobcat X337 and X341 Excavator Service Manual
$29.00 -
×
 Kobelco LK600A Wheel Loader Service Manual
$32.50
Kobelco LK600A Wheel Loader Service Manual
$32.50 -
×
 Caterpillar CAT 14G Motor Grader Service Repair Manual (96U00001 till 01097)
$70.00
Caterpillar CAT 14G Motor Grader Service Repair Manual (96U00001 till 01097)
$70.00 -
×
 Bobcat E26 Excavator Repair Service Manual
$38.00
Bobcat E26 Excavator Repair Service Manual
$38.00 -
×
 Bobcat BL470, BL475 Loader Service Repair Manual
$38.00
Bobcat BL470, BL475 Loader Service Repair Manual
$38.00 -
×
 JCB Vibromax 1105, 1106, 1405, 1805 Single Drum Roller Service Manual
$27.00
JCB Vibromax 1105, 1106, 1405, 1805 Single Drum Roller Service Manual
$27.00 -
×
 John Deere 310SL Backhoe Repair Technical Manual (S.N after C273920 & D273920 - 390995)
$61.00
John Deere 310SL Backhoe Repair Technical Manual (S.N after C273920 & D273920 - 390995)
$61.00 -
×
Caterpillar CAT 120H Motor Grader Service Repair Manual (12400001 and up)
$70.00
-
×
 John Deere 310L Backhoe Loader Repair Technical Manual (S.N after F390996 -)
$54.00
John Deere 310L Backhoe Loader Repair Technical Manual (S.N after F390996 -)
$54.00 -
×
 John Deere 710L Backhoe Loader Repair Technical Manual (S.N after F390996 -)
$56.00
John Deere 710L Backhoe Loader Repair Technical Manual (S.N after F390996 -)
$56.00 -
×
 JCB 411, 416 Wheeled Loader Shovel Service Manual
$34.50
JCB 411, 416 Wheeled Loader Shovel Service Manual
$34.50 -
×
 John Deere 310S Backhoe Loader Technical Manual (SN. F273920-)
$59.00
John Deere 310S Backhoe Loader Technical Manual (SN. F273920-)
$59.00 -
×
 John Deere 315SG Backhoe Loader Repair Technical Manual (S.N after BE315SG200039 - )
$53.00
John Deere 315SG Backhoe Loader Repair Technical Manual (S.N after BE315SG200039 - )
$53.00 -
×
 John Deere 710D Backhoe Loader Repair Technical Manual
$56.00
John Deere 710D Backhoe Loader Repair Technical Manual
$56.00 -
×
 John Deere 310K Backhoe Loader Repair Technical Manual (S.N after C000001 - )
$57.00
John Deere 310K Backhoe Loader Repair Technical Manual (S.N after C000001 - )
$57.00 -
×
 Sennebogen 830.0.1156 Operators, Maintenance and Parts Manual
$42.00
Sennebogen 830.0.1156 Operators, Maintenance and Parts Manual
$42.00 -
×
 Bobcat TL360 and TL360X Telescopic Handler Service Manual
$35.00
Bobcat TL360 and TL360X Telescopic Handler Service Manual
$35.00 -
×
 Caterpillar CAT CS-533E, CP-533E Vibratory Compactor Service Repair Manual (DAK00001 and up)
$50.00
Caterpillar CAT CS-533E, CP-533E Vibratory Compactor Service Repair Manual (DAK00001 and up)
$50.00 -
×
 John Deere 310L Backhoe Loader Repair Technical Manual (S.N after C000001 & D000001 - )
$53.00
John Deere 310L Backhoe Loader Repair Technical Manual (S.N after C000001 & D000001 - )
$53.00 -
×
 John Deere 310K Backhoe Loader Repair Technical Manual (S.N after E219607 - )
$54.00
John Deere 310K Backhoe Loader Repair Technical Manual (S.N after E219607 - )
$54.00 -
×
 Sennebogen 825.0.1422 Operators, Maintenance and Parts Manual
$41.00
Sennebogen 825.0.1422 Operators, Maintenance and Parts Manual
$41.00 -
×
 Takeuchi TB125, TB135 and TB145 Excavator Service Manual
$36.50
Takeuchi TB125, TB135 and TB145 Excavator Service Manual
$36.50

Comprehensive Guide: Installation of Exhaust Gas Temperature Sensor
Product Overview
This guide provides detailed instructions for the installation of an Exhaust Gas Temperature (EGT) sensor, ensuring precise assembly and optimal performance. Follow these steps to correctly mount the sensor in the oxidation catalyst assembly, maintaining attention to specified precautions to avoid damage.
Key Features
- Step-by-step installation instructions
- Specification of anti-seize lubricant usage
- Torque guidelines for sensor tightening
- Important safety notices to prevent damage
Benefits
- Enhances engine performance by accurate temperature monitoring
- Reduces installation errors with detailed guidance
- Prolongs the sensor’s lifespan with proper handling instructions
- Ensures safe operations with explicit safety warnings
Usage Recommendations
- Regularly maintain and inspect the EGT sensor to ensure effective performance.
- Use High Temperature Stainless Never-Seez lubricant (5-87411-039-0) from Bostik USA for optimal sensor installation.
- Adhere strictly to the specified torque value of 30 Nu00b7m (22.1 lb ft) when finalizing sensor installation.
- Avoid applying shock to the sensor tip during installation to prevent damage.
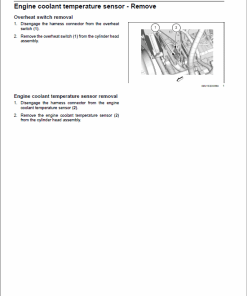
Installation Steps
- Thoroughly clean old anti-seize lubricant from the sleeve nut, then apply new anti-seize lubricant to the threaded section.
- Apply anti-seize lubricant to the EGT sensor with care.
- Hand-tighten the EGT sensor temporarily to the oxidation catalyst assembly.
- Be cautious during installation to avoid impacting the sensor tip. If the sensor or oxidation catalyst is damaged, replacement is necessary.
- Final tighten the EGT sensor using a torque wrench to 30 Nu00b7m (22.1 lb ft).
- Securely connect the harness connector to the EGT sensor, ensuring no twisting occurs.
- Start the engine post-assembly to check for gas leaks and vibrations at connection points.
Only logged in customers who have purchased this product may leave a review.
Related products
$33.00
$34.00


$34.50

$34.00
$35.00
$34.00
$32.00
Reviews
There are no reviews yet.